Also, fix the SPI relay driver to properly AND-away the result of
the CTL read.

Tested with a real prototype, works fine.
5.1 KiB
Accessing a MicroSD card
SD cards are great because they are accessible directly. No supporting IC is necessary. The easiest way to access them is through the SPI protocol.
Due to the way IO works in z80, implementing SPI through it as a bit awkward: You can't really keep pins high and low on an IO line. You need some kind of intermediary between z80 IOs and SPI.
There are many ways to achieve this. This recipe explains how to build your own hacked off SPI relay for the RC2014. It can then be used with the SD Card subsystem (B420) to drive a SD card.
Gathering parts
- A RC2014 Classic
- A MicroSD breakout board. I use Adafruit's.
- A proto board + header pins with 39 positions so we can make a RC2014 card.
- Diodes, resistors and stuff
- 40106 (Inverter gates)
- 74xx138 (Decoder)
- 74xx375 (Latches)
- 74xx125 (Buffer)
- 74xx161 (Binary counter)
- 74xx165 (Parallel input shift register)
- 74xx595 (Shift register)
Building the SPI relay
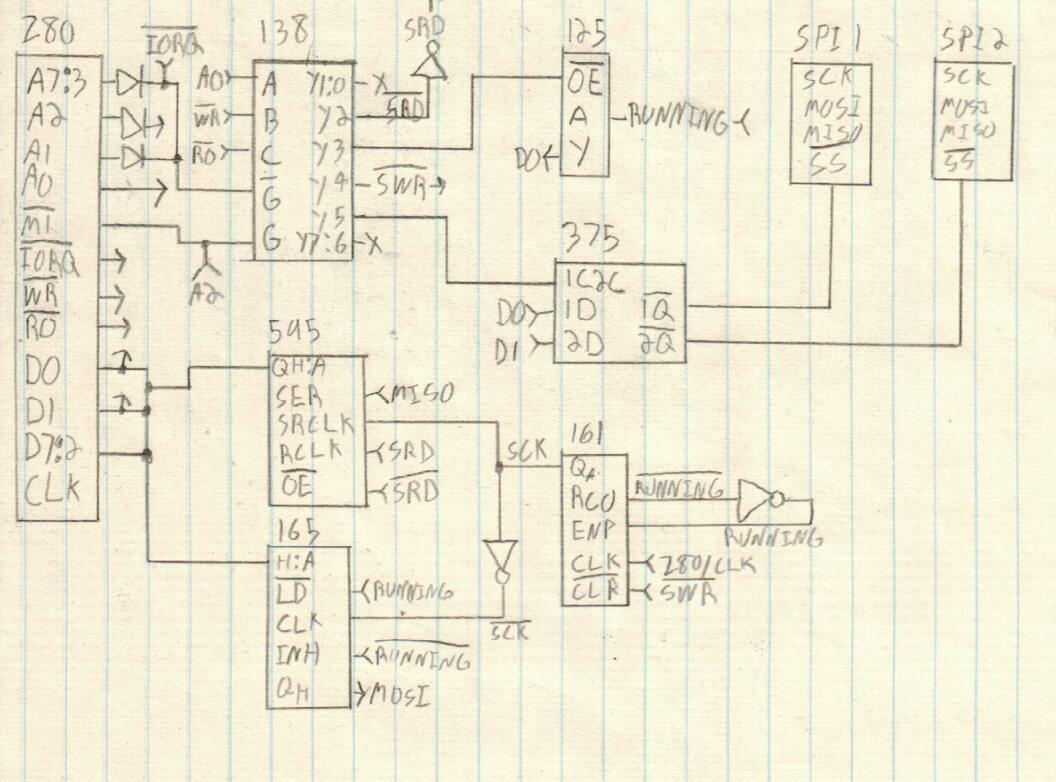
The schematic above works well with the SD Card subsystem (B420). Of course, it's not the only possible design that works, but I think it's one of the most straighforwards.
This relay communicates through the z80 bus with 2 ports, DATA and CTL and
allows up to 4 devices to be connected to it at once, although only one device
can ever be active at once. This schema only has 2 (and the real prototype I've
built from it), but the '375 has room for 4. In this schema, DATA is port 4,
CTL is port 5.
We activate a device by sending a bitmask to CTL, this will end up in the
'375 latches and activate the SS pin of one of the device, or deactivate them
all if 0 is sent.
You then initiate a SPI exchange by sending a byte to send to the DATA port.
This byte will end up in the '165 and the '161 counter will be activated,
triggering a clock for the SPI exchange. At each clock, a bit is sent to MOSI
from the '161 and received from MISO into the '595, which is the byte sent to
the z80 bus when we read from DATA.
When the '161 is wired to the system clock, as it is in the schema, two NOPs
are a sufficient delay between your DATA write and subsequent DATA read.
However, if you build yourself some kind of clock override and run the '161 at
something slower than the system clock, those 2 NOPs will be too quick. That's
where that '125 comes into play. When reading CTL, it spits RUNNING into
D0. This allows you to know when the result of the SPI exchange is ready to be
fetched. Make sure you AND away other bits, because they'll be garbage.
The '138 is to determine our current IORQ mode (DATA/CTL and WR/RO), the
'106 is to provide for those NOTs sprinkled around.
Please note that this design is inspired by this design.
Advice 1: Make SCK polarity configurable at all 3 endpoints (the 595, the 165
and SPI connector). Those jumpers will be useful when you need to mess with
polarity in your many tinkering sessions to come.
Advice 2: Make input CLK override-able. SD cards are plenty fast enough for
us to use the system clock, but you might want to interact with devices that
require a slower clock.
Building your binary
The binary built in the base recipe doesn't have SDC drivers. You'll need to
assemble a binary with those drivers. To do so, you'll modify the xcomp unit
of the base recipe. Look at xcomp.fs, you'll see that we load a block. That's
our xcomp block (likely, B599). Open it.
First, we need drivers for the SPI relay. This is done by declaring SPI_DATA
and SPI_CTL, which are respectively 4 and 5 in our relay design.
You also need to tell the SDC subsystem which SPI device to activate by defining
the SDC_DEVID (1, 2, 4, 8 for device 0, 1, 2 or 3)
You can then load the driver with 596 LOAD. This driver provides
(spix) and (spie) which are then used in the SDC driver.
The SDC driver is at B420. It gives you a load range. This means that what
you need to insert in xcomp will look like:
423 436 LOADR ( sdc )
You also need to add BLK$ to the init sequence.
Build it (run make pack in cvm/ first to ensure an up-to-date blkfs) and
write it to EEPROM.
Testing in the emulator
The RC2014 emulator includes SDC emulation. You can attach a SD card image to it by invoking it with a second argument:
../../../emul/hw/rc2014/classic os.bin ../../../cvm/blkfs
You will then run with a SD card having the contents from /blk.
Usage
First, the SD card needs to be initialized
SDC$
If there is no error message, we're fine. Then, we need to hook BLK@* and
BLK!* into the SDC driver:
' SDC@ BLK@* !
' SDC! BLK!* !
And thats it! You have full access to disk block mechanism:
105 LOAD
BROWSE
(at this moment, the driver is a bit slow though...)
How do I fill my SD card with Collapse OS' FS?
Very easy. You see that /cvm/blkfs file? You dump it to your raw device.
For example, if the device you get when you insert your SD card is /dev/sdb,
then you type cat emul/blkfs | sudo tee /dev/sdb > /dev/null.
